The “video_dxgkrnl_fatal_error” is a type of Blue Screen of Death (BSOD) error on your Windows system. This error is typically related to the DirectX Graphics Kernel subsystem and signifies issues with the system graphics driver or the graphics card or hardware.
When you encounter the terrible fatal error dxgkrnl bsod, you might find that your system has stopped working, or at times, it might also crash. This can be due to various reasons, like corrupted or outdated graphics drivers, graphics card problems or failures, clashes between different hardware components, firmware corruption, lack of storage space, or resource crunch due to a lot of resource-consuming applications running in the background, and in some cases, it can also be due to a change or modification in the BIOS and other important boot settings.
This article will help you easily fix the dxgkrnl sys bsod error.
But before we proceed with the troubleshooting solutions, I highly recommend that you first try to recover your files from your system. Your files might get damaged or, in some cases, lost.
CAT Data Recovery Software is one such tool that is designed to help you recover any type of files from any Windows system as well as any external storage device.
If you have a backup of those files and folders, you can immediately start repairing the video dxgkrnl fatal error.
Table of Contents:
- How to Fix Video Dxgkrnl Fatal Error on Windows?
- Restart your System
- Boot Windows in Safe Mode
- Perform a Clean Boot
- Update Graphics Drivers to Fix video_dxgkrnl_fatal_error
- Run Antivirus Scan
- Run Hardware Troubleshooter
- Run SFC Command
- Run DISM Command
- Recover Data Lost After Encountering Video_Dxgkrnl_Fatal_Error
- Conclusion
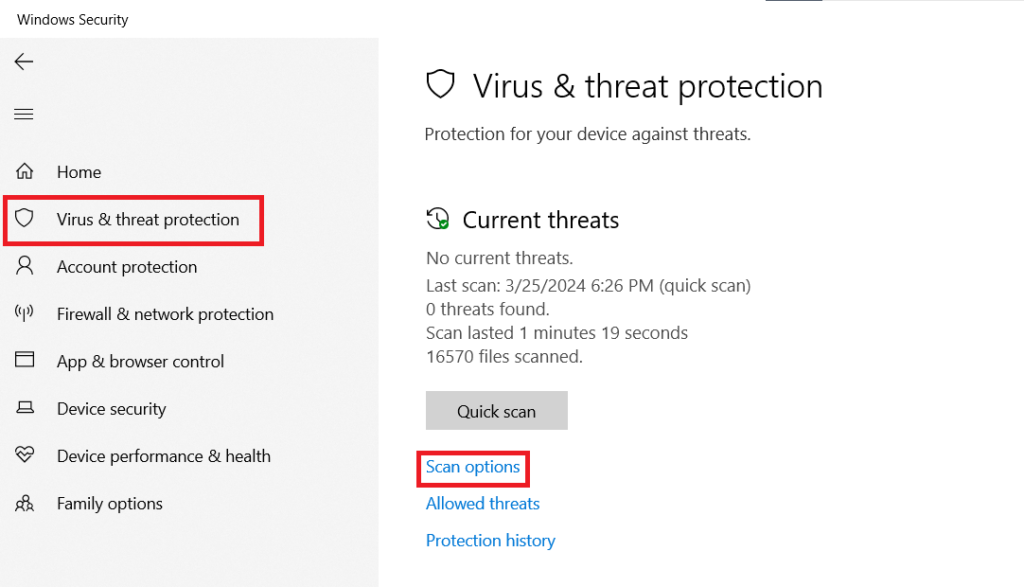
How To Fix Video_Dxgkrnl_Fatal_Error on Windows?
The answer mainly depends on the cause of the issue. If the fatal error dxgkrnl was due to a virus or malware attack, one can try fixing the issue by running a quick Antivirus scan. Similarly, if the issue is due to an outdated driver, you can try updating the graphic drivers. If none of these solutions were helpful, one should try booting the system in Safe Mode; as explained earlier, the boot order might have been changed or modified.
If these solutions were fruitless, you can perform scans on hardware devices, system files, etc., using tools like Hardware Troubleshooter, SFC Command, DISM Command, etc.
I highly recommend you try restarting your system first.
Method 1: Restart your System
At times, a simple system restart can help you fix not only the dreaded blue screen of death video dxgkrnl fatal error Windows 10 and other versions.
This solution is particularly helpful in cases of temporary glitches, uninitialized graphics drivers, constrained system resources, etc.
A quick system restart can help you fix these issues almost immediately and without any extra effort or paying anything.
If, in case, restarting or rebooting your system was useless or did not fix the issue, then I recommend you run a quick Anti-virus scan to eliminate the possibility of a virus or malware attack, as well as corruption.
Method 2: Boot Windows in Safe Mode
Starting your system in safe mode loads only the essential system files or basic set of drivers in an absolutely stable environment with minimal system resources.
If the dxgkrnl.sys error does not appear in Safe Mode; the issue is mainly due to interference with third-party applications or drivers, such as problematic drivers or improper or incorrect system configurations.
You can boot into Safe Mode from the Settings menu, from the sign-in screen using the Troubleshoot option, or by entering into Windows Recovery Environment.
Since you have encountered the dxgkrnl blue screen in Windows 10 and other versions, you won’t be able to use your system as usual. In such cases, I recommend you enter the Windows Recovery Environment.
The next solution talks about booting the Windows system using the clean boot option, which will help eliminate conflict among different programs and identify the core cause of system issues.
Method 3: Perform a Clean Boot
Clean boot is a simple troubleshooting technique used by Windows users to start the computer in a relatively simple and clean manner with a minimal set of drivers and programs.
This will help you identify and fix any issues that might be caused by startup programs, other services, or due to conflict between various software.
Steps to Perform Clean Boot on Windows
- Sign in to your Windows computer as an admin or administrator.
- Search for the msconfig in the search bar, and click on the System Configuration App.
- In the System Configuration window, click on the Services tab. Select the Hide all Microsoft services option, then click on the Disable all option, followed by clicking on the Apply button.
- Go to the Startup tab and click on the Open Task Manager.
- A list of all enabled or active applications will be displayed on your screen.
- Disable all the programs one by one. Select the program and click on the Disable option.
- Once you have disabled the applications, close the Task Manager window.
- In the Startup tab of the System Configuration, click on the OK button.
- Now, when you restart your computer, it will automatically boot in a Clean boot environment.
Do note: After performing a clean boot, you will lose some functionalities. You can restore those lost functionalities by simply resetting your system.
If you have again encountered the video_dxgkrnl_fatal_error, the issue might be related to drivers. In that case, I recommend upgrading your system’s graphics drivers.
Method 4: Update Graphics Drivers to Fix video_dxgkrnl_fatal_error
An outdated, corrupt, or problematic graphics driver can be the major cause of the dxgkrnl error on your Windows system.
I recommend you check if your device’s drivers are up to date. Incompatibility between the system and the drivers can lead to miscommunication, thereby prompting errors like the dxgkrnl.sys error.
Also, outdated drivers are responsible for causing the dxgkrnl sys crash. These old or problematic drivers might contain bugs or errors that make your system unstable.
Here’s how you can fix the Blue Screen Video_Dxgkrnl_Fatal_Error by upgrading your system’s drivers.
- Simultaneously, fix the Windows + X buttons from the menu. Find and click on the Device Manager option.
- From the list of all the available drivers. Right-click on the Display adapters, click on the Display Driver, and click on the Update Driver option.
- Click on the Search automatically for drivers option on the next screen.
- The Operating system will start searching for any new updates and installs the same.
If the issue is not with the third-party applications or with the graphic drivers. Then there’s a high chance that your device has been infected with malware or viruses.
Method 5: Run Antivirus Scan
As mentioned earlier, the dxgkrnl sys bluescreen issue can sometimes be caused by a virus or malware attack. To eliminate guesswork and pinpoint the exact issue. I highly recommend running an Antivirus scan to rule out any malicious actors.
If you found out the issue was caused due to corruption after virus attacks, in such cases, I recommend you repair the corrupt files using specialized repair tools.
Note: The video_dxgkrnl_fatal_error stems from system issues and issues with the drivers. But at times, you might find your video files have become corrupted, after encountering this error. If that is the case, I recommend you go through this article to learn how to easily repair corrupt video files.
However, if you have ensured that the issue was not due to virus attacks. You can run scans like the Hardware Error Checking tool, SFC Command, and DISM Command in such cases.
Method 6: Run Hardware Troubleshooter
Hardware Troubleshooter is a free tool built into Windows systems. Designed to diagnose and troubleshoot common hardware issues that might have triggered the video_dxgkrnl_fatal_error.
1: Hit the Windows + R key to launch the Run window.
2: In the Run window, type in the “msdt.exe -id DeviceDiagnostic” command and click on the OK button.
3: Hardware and Devices window will get displayed on your screen. Click on the Next button to start the process.
4: The tool will start detecting the problems and issues with the hardware. Upon completion of the scan. You need to click on the Apply this fix option and restart your system.
If the issue is with your system files, you should try tools like System File Checker Utility.
Method 7: Run SFC Command
The System File Checker is a free built-in command line Windows utility that can help users scan for missing and repair corrupt system files.
The SFC command scans your Windows system to search for any missing or corrupted system files that might be the reason behind the dxgkrnl.sys error. Once the scan is complete, the utility will start repairing those system files. Which improves your system’s overall stability and performance.
Steps to Fix the dxgkrnl.sys BSOD Error using the SFC Scan
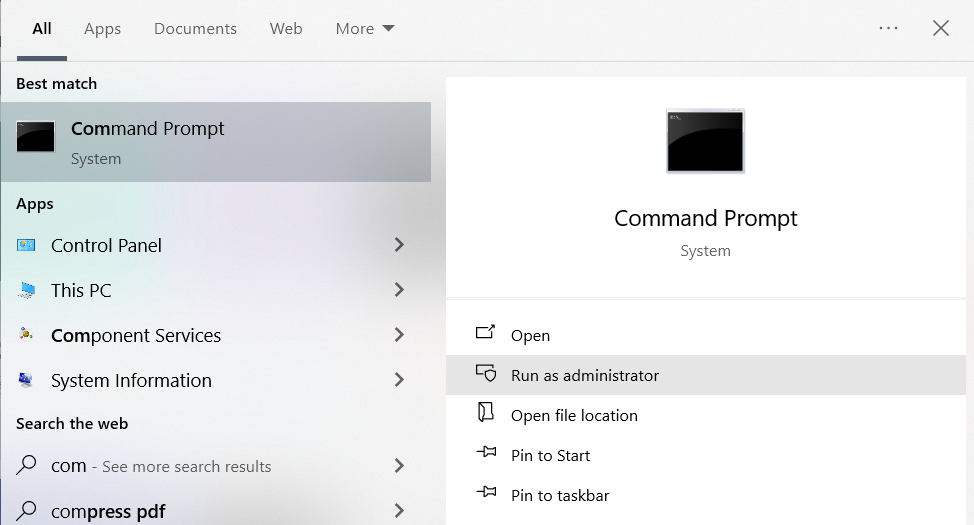
- Launch the Command Prompt as an administrator on your Windows system.
- Type the sfc/scannow command, and hit the Enter key.
- The SFC utility now starts scanning the system and repairing your problematic system files.
- Upon completion of the system repair scan, restart your system and see if the issue has been resolved.
If you found that the SFC scan did not fix the issue of the Video dxgkrnl fatal error on Windows. You need to run the DISM command, which is similar to the SFC command but designed to perform more advanced tasks.
Method 8: Run DISM Command
The DISM Command, or the Deployment Image Servicing and Management is a built-in utility for repairing and maintaining system files and entire Windows system images and performing more advanced maintenance tasks.
1: Open the Command Prompt utility as an administrator.
2: Type in the dism/online/cleanup-image/restorehealth command and hit the Enter button.
3: Wait till the restore operation is complete.
4: Upon completion of the scan, restart your Windows system.
I am quite sure that you were able to fix the dxgkrnl.sys failure issue after following the solutions mentioned earlier.
But if the issue continues to trouble you, you can try restoring your system or upgrading your Windows OS.
Recover Data Lost After Encountering Video_Dxgkrnl_Fatal_Error
If you have lost data after encountering the video_dxgkrnl_fatal_error or the dxgkrnl.sys failure or while you were trying to troubleshoot the issue.
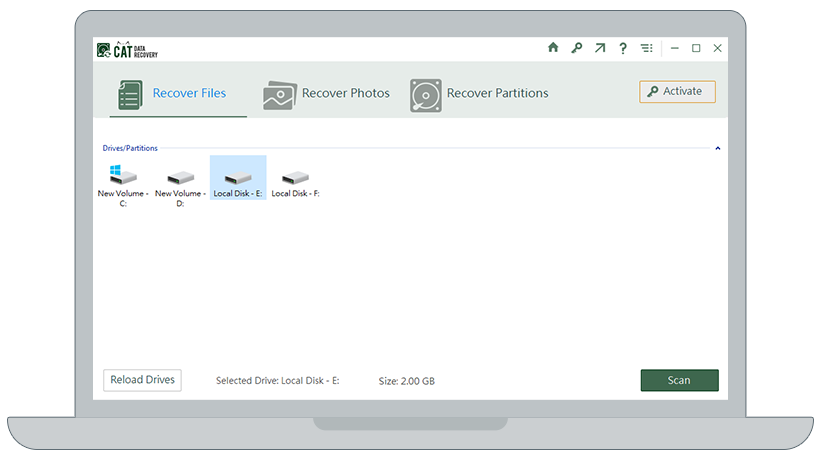
Then, professional tools like CAT Data Recovery Software can help you. This easy-to-use tool can help you recover lost files, folders, and data from any Windows system and any storage device.
All you need to do is download the tool on your Windows system. Launch the tool, select the drive, and start the scanning process. Upon completion of the lost data recovery process, preview and save the recovered data in any location of your choice.
Conclusion
Blue Screen of Death errors, especially the Video_Dxgkrnl_Fatal_Error, can be quite stressful. Thankfully, we are aware of the solutions to help you fix the issue. In this article. We have talked about solutions like restarting your system to resolve minor technical glitches, booting your system in Safe Mode, performing Clean Boot. Upgrading the graphic drivers if the issue was due to outdated or corrupt drivers. Running Anti-Virus Scan to get rid of viruses or malware. In extreme cases, the issue might get triggered due to missing or corrupt system files. Where solutions like running the SFC scan and DISM scan can be helpful in resolving the video_dxgkrnl_fatal_error.


