When you think of restoring a few files that you had moved to Recycle Bin, you may encounter an error that says your Recycle Bin is corrupted as shown in the image.

If you proceed and click on Yes, files that were present within will be lost. So, click on No and stop wondering how you can fix this corrupted Recycle Bin without losing data.
This informational write-up will help you to fix the corrupted Recycle Bin for free with the help of the Command Prompt utility. Before trying to fix the corrupted Recycle Bin, let us understand the reason behind this corruption.
What Causes a Corrupted Recycle Bin?
Each partition of your Windows computer has a hidden and protected folder named as “$Recycle.bin”. You will be able to locate this folder once you check the Hidden items box present in the Windows Explorer toolbar, you will be able to see it. When you delete, copy, or overwrite any files on a partition, you might accidentally modify this protected Recycle Bin folder too. Hence, Recycle Bin on your Windows 10, 8.1, and 8 will be corrupted.
A missing .dll file or deleted program files from the $Recycle.bin folder leads to a corrupted Recycle Bin. However, this corruption can be quickly fixed as the error message gives a hint as to which partition has a corrupt Recycle Bin folder. Read the next section, it will guide you in fixing your corrupt recycle bin.
Quick Fixes for Corrupt Recycle Bin Error
Before proceeding to fix the Recycle Bin which is corrupted, it is important to know that this will replace all the affected system files and remove the files that were stored in the Recycle Bin.
Table Of Contents |
|
Fix 1: Use the Command Prompt to repair the Corrupt Recycle bin Fix 2: Restore the Recycle bin to default Fix 3: Switch the User Profile and forget Recycle bin corruption |
With the help of a professional Recycle Bin recovery tool, data that was deleted or removed while fixing the corrupted Recycle Bin will be successfully recovered. Below, are the steps given to fix the Recycle Bin which is corrupted and inaccessible.
Fix 1: Use the Command Prompt to repair the Corrupt Recycle bin
- Press Windows + R. Type cmd and press Ctrl + Shift + Enter to run the Command Prompt as Administrator.
- Type or copy-paste this command “rd /s /q C:$Recycle.bin” and hit enter.
- Once this process is complete, again paste the command but replace the C: with the drive letter that was displayed when the error was prompted.
- Reboot your computer once the repair is complete and your Recycle Bin folder will be fixed.
Though the $Recycle.bin folder is present in every partition, the C: drive is the main location of your system files. Thus, the repair process is done on the primary $Recycle.bin folder first and then on the corrupted $Recycle.bin folder.
Fix 2: Restore the Recycle bin to default
Also, there is a quick method to fix the Recycle Bin which is corrupted in Windows 10. Just follow the steps given below and your corrupt Recycle Bin will be fixed in no time.
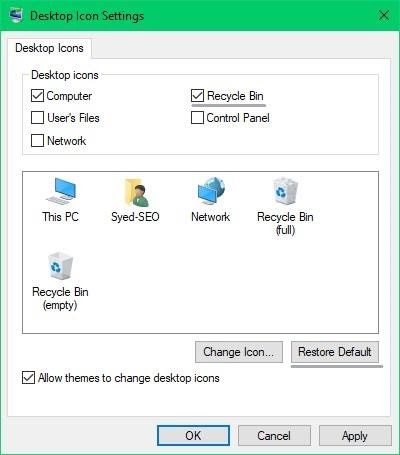
- Right-click on your desktop and select Personalize.
- Click on Themes and select Desktop icon settings.
- Check the Recycle Bin option, select Restore defaults, and click on Apply as shown in the image below.
With the above-mentioned steps, your Recycle Bin which is corrupted will be surely fixed. As mentioned before, do not forget to take the aid of the Recycle Bin recovery to restore the files lost while fixing the error.
If neither option worked for you we have one last trick that you can try.
Fix 3: Switch the User Profile and forget Recycle bin corruption
The recycle bin corruption in most cases is user-profile specific. This means you can simply create a new user profile and test if the problem is resolved. Just follow the steps.
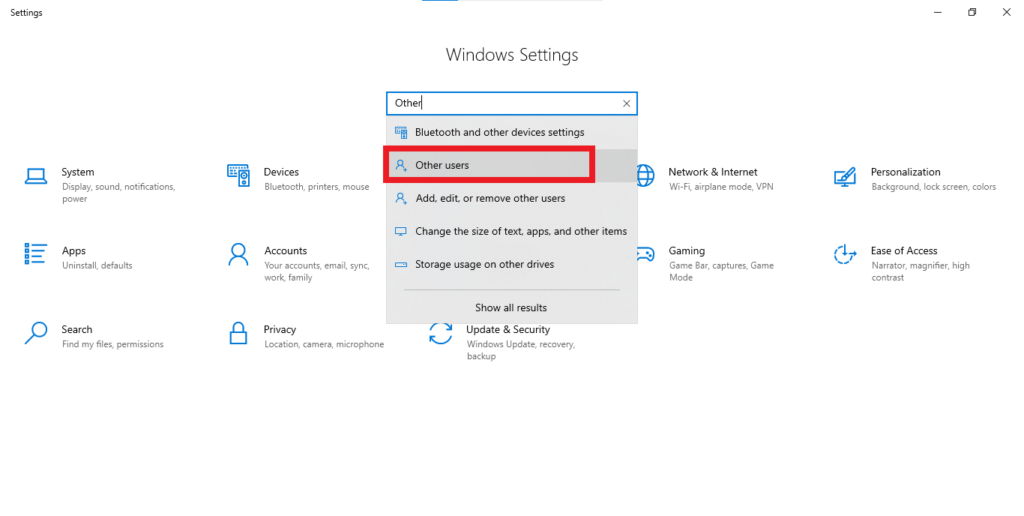
- Press Windows + I to open Settings.
- In the search bar, search for Other users.
- Under other users select Add someone else to this PC.
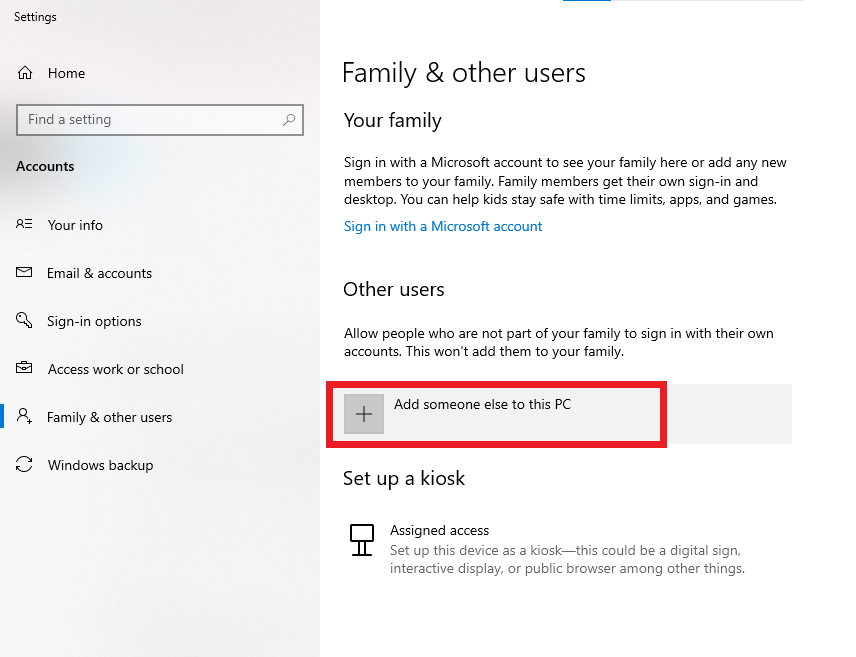
- Follow the on-screen instructions to create a new profile.
- Log in to the newly created profile.
If the Recycle bin is working properly, transfer the files and settings from the older profile.
Note: You may also try using SFC (system file checker) or chkdsk command but as they are designed to check for system files, file system integrity, and drive errors, they will in most cases not fix the recycle bin or its data structure.
The last option left for you is to restore your computer. But this will remove your data. So, create a backup. In case you forget to take backup or still lose data you can use CAT Data Recovery to recover your data.
Download and try it now.
[Bonus Tip] Recover Data using CAT Data Recovery
In case the recycle bin is not fixed and you have data that you want to extract. you can use CAT Data Recovery for quick and safe data recovery.
To recover data using CAT Data Recovery follow the steps:
- Launch the tool, and click on Recover Files.
- Select the drive that was displayed in the error and click on Scan.
- The tool will initiate a scanning process, after completion of the scanning process the tool will display the recovered deleted files
- Preview the recovered files and check if you have got back all your deleted files.
- If you are satisfied with the process of deleted file recovery, activate the tool and Save the recovered files in your desired location.
CAT Data Recovery can also recover data from an SSD, unmountable drive, inaccessible drives, and under many such scenarios.
Conclusion
We have provided you with all the necessary knowledge to fix your corrupted recycle bin. In case, you still have any queries or doubts feel free to contact us.


