A RAW partition is a partition that does not have a file system or file structure. The File system is essential for any operating system to read the data present within.
Hence, if your NTFS file system has turned RAW on your Windows 7, 8, 8.1, 10, or 11 computers, the OS will not be able to read the information and files present within the partition.
Your NTFS drive can turn RAW due to various reasons such as corruption, physical errors such as accumulation of bad sectors, disk malfunction, or other physical damages, corrupt partition table, virus or malware infection, incorrect settings or improperly configured operations in the Disk Management, and failed file system conversion process.
You might receive any of the following messages or errors when your NTFS partition or disk has turned RAW:
Scenarios and Error Messages That Refer to A RAW Partition:
- The properties of the partition show as 0 bytes used
- “You need to format the disk in the drive before you can use it,” error
- “The disk in drive is not formatted. Do you want to format it?” error
- “The file or directory is corrupt and unreadable” error
- “The type of the file system is RAW. CHKDSK is not available for RAW drives” error
- “The volume does not contain a recognized file system” error
If you have encountered any of these error messages or any other message, you have come to the right place. This article will explain how to convert RAW to NTFS without losing data.
But before you proceed further and start the disk conversion process. I recommend you first recover data from the RAW drive since there’s a high chance you might lose your data during the File System changing process. Hence, the only way to ensure you safely change file systems from RAW to NTFS without data loss is by recovering data from the drive using professional data recovery tools.
If you have a backup of the data stored in the drive that has turned RAW. Feel free to skip this section and directly move to the next part which talks about four solutions to help you convert RAW file system to NTFS.
Recover Data from the Disk that has Turned RAW
Professional tools like the CAT Data Recovery Software are designed to scan the RAW drive, identify and find lost or missing files, and easily recover them from any RAW partition or storage device, including Hard Drives, SSDs, USB Flash Drives, Pen Drives, and even Memory and SD cards.
Steps To Recover Data From RAW Drives or Partitions
1: Download and set up the CAT Data Recovery tool on your Windows or Mac system.
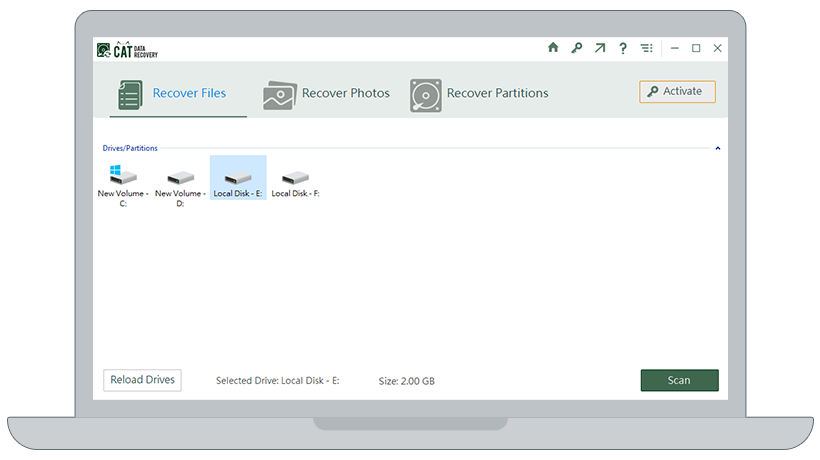
2: Launch the tool, and from the main screen, select the drive that has turned RAW and click on the Scan button.
3: The tool will start scanning the RAW drive. Upon completion of the scanning process. You can use the Preview option to have a look at the recovered data.
4: Once you are sure that the RAW Drive data has been recovered safely. Save it on any location of your choice, such as another partition or drive.
Once you have saved the data to another location, it’s time to convert the RAW drive to NTFS.
How To Convert RAW Disk to NTFS?
There are four ways to convert a disk from RAW to NTFS. The first one is by assigning the RAW Drive or partition as NTFS in Disk Management; the second one is by converting RAW to NTFS via CMD or Command Prompt; the third one is by using Diskpart; and the last one in this list is to format the RAW drive with the NTFS File System.
We will be exploring all of these solutions in-depth in this section.
Method 1: Restore NTFS Partition from RAW using Disk Management
Assigning the RAW drive as NTFS in the Disk Management will help the operating system understand the drive’s file system.
Do note: this process doesn’t directly convert the disk. However, it tries to repair and rebuild the file system metadata structures so that your Windows or Mac OS can identify, recognize, and provide you with access to your data.
The partition that has turned RAW will be labeled as Unallocated or unidentified in the Disk Management program. If the drive has not been heavily affected, this partition can be restored.
In case, the RAW partition has not been labeled as unallocated but is displayed in the partition list, right-click on that drive, select Format, and change the preferences to NTFS.
If the RAW partition has been labeled as Unallocated, follow the steps mentioned below.
1: Go to the Device Manager on your Windows computer.
2: Expand Disk drives and then right-click on the RAW drive that has been labeled as Unallocated.
3: After right-clicking on the RAW partition, click on Scan for partitions and wait until the program scans the drive.
4: Click on the Restore Partition and wait till the dialog box is displayed.
5: Assign a drive letter, select the NTFS file system, and click on Restore to start the RAW partition recovery process.
This solution only works on drives that are minorly damaged or corrupted. For severe corruption or other issues, you need to try the other solutions mentioned below.
Method 2: Repair RAW Drive Using Command Prompt
The primary job of CHKDSK is to check the file system and fix the issues and errors on the disk. While the CKHDSK is a great tool, it can’t directly convert or change the RAW file format to NTFS.
One can try to run CHKDSK to repair file system errors, such as bad sectors, corrupted file records, issues or errors with system directories, etc.
At times, your disk or partition might turn RAW due to these reasons. Hence, fixing them might help you fix the RAW drive into a working and functional state.
1: Run the Command Prompt as an administrator.
2: Enter the following command “chkdsk /r /f a“
Where; the parameter “r” is used to locate bad sectors and recover any readable information. “f” to fix issues on your drive or the partition, and in place of “a” you need to mention your drive’s assigned letter.
3: If you get a prompt stating to schedule disk check on system restart, type “y” and hit the Enter button.
4: Restart your system, and check if the RAW Drive is shown as NTFS drive or any other file system. You can do this in the File Explorer, or in the Disk Management.
If the issue still persist, you can try the following steps.
5: Type or copy-paste this code “convert (driver letter): /fs:ntfs” and hit Enter.
Note: Do not forget to replace the (drive letter) with the letter assigned to your RAW partition.
6: Wait until the process is complete, and do not close the window once the process is complete.
7: After the first process is complete, copy-paste this command “chkdsk x: /B” and replace the “X” with the drive letter assigned to your RAW partition.
The first two solutions are recommended when you want to convert raw disk to ntfs without format.
The next solutions talk about formatting the RAW drive to NTSF file system.
Method 3: Restore RAW Partition Back to NTFS Using DiskPart
DiskPart is an in-built Command Prompt utility of the Windows operating system that allows you to sort, create, delete, modify, and fix partitions of internal and external storage drives. When one uses DiskPart is on a RAW partition, files, and data that were previously present will ger formatted.
After completely removing the data, the DiskPart utility reassigns a file system to the partition to make it accessible.
Steps to Format RAW partition using DiskPart
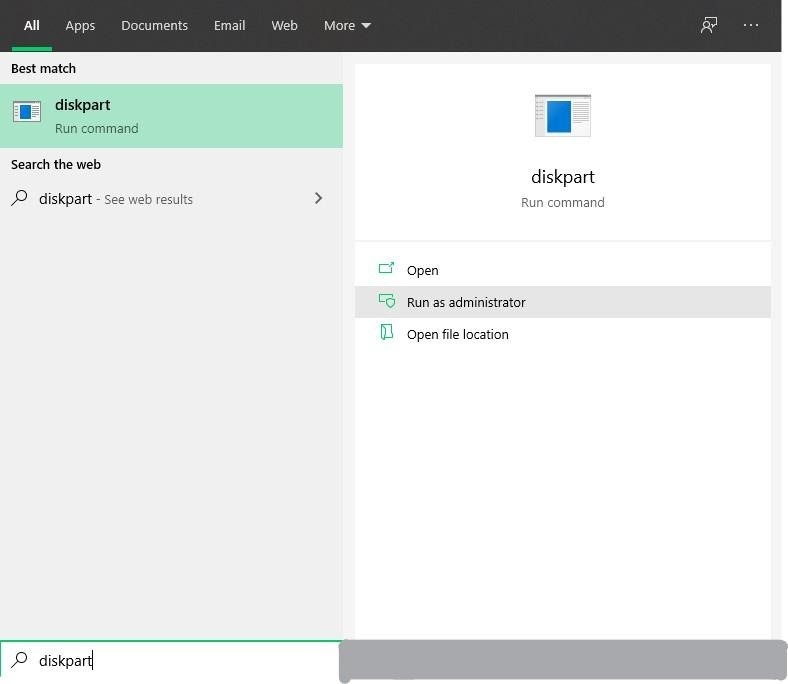
1: Click on the Windows logo button and type diskpart.
2: Right-click on diskpart.exe and select Run as administrator.
3: Type or copy the command list volume and hit enter.
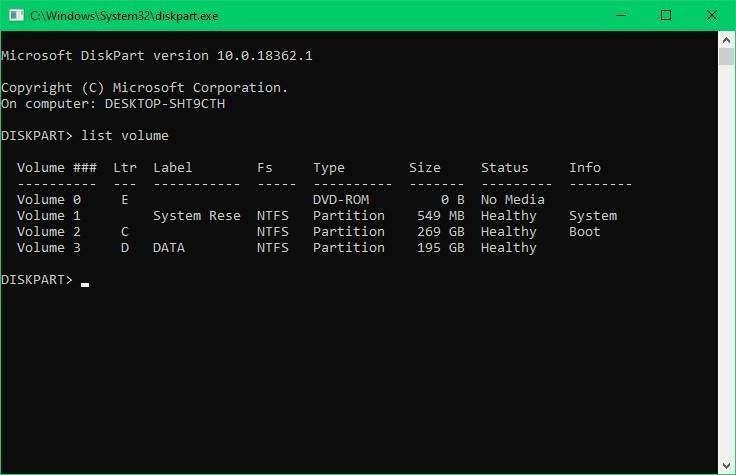
Note: The partition that has turned RAW will be labeled as RAW in the fs column as shown in the image. Remember the volume number of your RAW partition, as it’ll be needed in the following steps.
4: Type or copy the command, select Volume #, and hit enter. (Here, the # refers to the number labeled to your RAW partition).
5: Type or copy the command “format fs=ntfs quick” and hit enter to format the partition as NTFS file system.
6: Type exit and hit enter once the RAW partition has been fixed using DiskPart.
I am sure, these solutions were useful. If not you are left with no other option but to format the drive.
Method 4: Format RAW Drive to NTFS Using File Explorer
Formatting the RAW drive with the NTFS file system is the most effective way to convert the RAW drive or partition.
Basically, when you format any drive, you create a new file system structure on the drive, which replaces the old or previously existing file system or lack thereof.
Follow the steps given below, and your RAW partition will convert into an accessible NTFS file system.
Steps to Format RAW Drive to NTFS File System
Step 1: Go to File Explorer and right-click on the partition that has turned RAW.
Step 2: Click on Format… and expand the File System drop-down.
Step 3: Click on Restore device defaults and uncheck the Quick Format option, as shown in the image below.
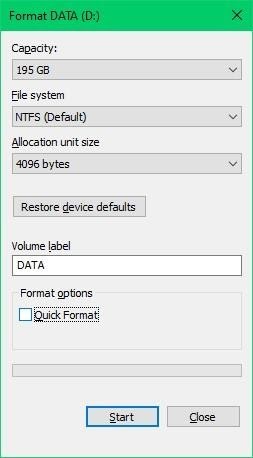
Step 4: Select Start and wait for the process to complete.
This process will take time to convert your RAW partition to NTFS, depending on the number of errors present within the drive.
How to Recover Data Lost While Converting RAW to NTFS?
One of these four methods must have helped you fix and convert the RAW partition to NTFS. However, these methods are only meant to fix RAW partitions and convert them into NTFS without ensuring the safety of your data.
To get back the files or data lost or deleted while converting RAW to NTFS, you will be needing professional RAW drive recovery software.
The depth of the scanning algorithm of this partition recovery software can recover folders and more than 300+ file types from your RAW partition. The interface and recovery process of CAT Data Recovery software is intuitive and self-explanatory, which results in a fast, safe, and 100% recovery process.
Download the free trial now to experience the easiest partition recovery process.
All you must do is select the RAW partition, click on Scan, and wait until the software displays the recovered data. The free version of this RAW partition recovery software offers a Preview feature that allows you to verify the files before purchasing the software and saving them to your desired location.
*If you have any questions regarding this partition recovery software, contact the dedicated support team of CAT Data Recovery. They will guide you until the data is recovered for free.


